SSO for Azure AD
Azure Configuration:
Building a Non-gallery app for Infosec Skills:
-
Log into your Azure Active Directory https://portal.azure.com.
-
Navigate to Enterprise applications.

-
Select New application in the top left corner.

-
Select Create your own application .

-
Input a name of your choice for the app such as “Infosec Skills SSO” and select “Integrate any other application you don’t find in the gallery”. On the lower right side of the window click Create to create your own application.

-
Navigate to Single sign-on and select SAML.

-
On the Set up Single Sign-On with SAML page, click Edit to open the Basic SAML Configuration dialog.

-
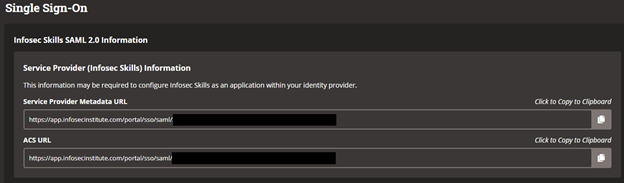
Input the Metadata URL and ACS URL from the Skills Teams Single Sign-On authentication page then click Save. If prompted to test single sign-on, select No, I’ll test later.
Note:
Identifier (Entity ID) will be the Service Provider Metadata URL located in Skills Teams Single Sign-On Page.Reply URL (Assertion Consumer Service URL) will be the ACS URL located in Skills Teams Single Sign-On page.

-
Back on the Set up Single Sign-On with SAML page, click Edit to open the User Attributes & Claims dialog.

-
On the User Attributes & Claims page, remove the default additional claims that exist by clicking on the ellipsis to the right of each of them and select Delete.

-
Add the following additional claims by clicking on Add new claim and inputting the following in each field, then click Save:
-
Claim for department
Name: department
Namespace: http://schemas.xmlsoap.org/ws/2005/05/identity/claims
Source attribute: user.department (use the drop-down menu)
-
Claim for department
-
Repeat step 11 and add the following 4 claims:
-
Adding the claim for email
Name: email
Namespace: http://schemas.xmlsoap.org/ws/2005/05/identity/claims
Source attribute: user.userprincipalname (use the drop-down menu) -
Adding the claim for first name
Name: first_name
Namespace: http://schemas.xmlsoap.org/ws/2005/05/identity/claims
Source attribute: user.givenname (use the drop-down menu) -
Adding the claim for last name
Name: last_name
Namespace: http://schemas.xmlsoap.org/ws/2005/05/identity/claims
Source attribute: user.surname (use the drop-down menu) -
Adding the claim for title
Name: title
Namespace: http://schemas.xmlsoap.org/ws/2005/05/identity/claims
Source attribute: user.jobtitle (use the drop-down menu)
-

-
Go to properties from the menu on the left under the Manage section and toggle User Assignment Required to Yes.
Users or groups must first be assigned to this application before being able to access it. To add users or groups, navigate to “Azure Active Directory > Enterprise applications > your application > Users and groups.”
-
Copy the App Federation Metadata URL from the Set up Single Sign-On with SAML page and paste it into the Identity Provider Metadata URL field on the Infosec Skills Teams SSO page (https://app.infosecinstitute.com/portal/teams/sso/settings), then click green Enable button to Save.


Optional settings
User assignment
By default, the SSO enterprise app just created in Azure AD has the “user assignment required” option turned off, which means that all users in the directory can access the application. To access this option in the Azure AD portal, navigate to “Azure Active Directory > Enterprise applications > your application > Properties”.
If the “user assignment required” is set to yes, then users or groups must first be assigned to this application before being able to access it. To add users or groups, navigate to “Azure Active Directory > Enterprise applications > your application > Users and groups.”